HITACHI PS-48 turntable
- repair instructions -
HITACHI PS-48 semi-automatic stereo turntable system
This and similar devices with servo controlled DC direct drive in two speeds were once very popular in the analogue age and long in use. Antiskating, hydraulic tonearm lift, automatic tonearm return, standard head shells for quick change of pick-up cartridges, adjustable force range, etc. were the comfort features of these analogue devices. With the advent of digital media, however, many still functional devices experienced a decade of sleeping beauty - if they were not thrown away. Younger generations, who did not yet live to the market launch (approx. 1976), however, today discover the vinyl as an audio medium, and old players are again looked for.
Now, however, it happens that a device after such a long lay time is difficult to get back into gears. While the printed circuit boards still look unobstructed, the mechanical inner life sometimes is in bad repair. Malfunctions often result from old, ineffective lubricants, which can slow down or even block mechanical movements.
At first glance the built-in mechanics may make a confusing impression. This guide is intended to provide some understanding so that malfunctions can be sought more specifically.
Problems around the tonearm automatic (auto return): Player does not start - tonearm is not reset
The tonearm automatic return is a specialty of the PS-48 model and a typical failure candidate. When the end of the record is reached, it ensures that the tonearm pivots upwards and back to the starting position. Once there, the tonearm is lowered and the engine is switched off. If this automatic operation no longer works, it can happen that the record player does not start, although no obvious damage can be detected. Or the return does not work and the last groove is not left.
Note!
The following description is intended for people who have been trained in electrical engineering. Unexperienced please take distance from the idea of opening the housing of this unit. Distributed in the inside of the device are contact points, which carry mains voltage. Incorrect or improper performance of repairs on the mechanics can lead to a risk of electric shock..
1. Dismantle tonearm mechanism
Check first: the device plug is disconnected! All investigations could be done without current supply. Normally the mechanical parts on the bottom of the unit do not have to be disassembled.
First remove the transparent cover (loosen 4 screws and pull off laterally, then upwards) and remove the rubber top from the turntable. Grasp the two openings of the turntable and press the aluminum plate off the motor shaft with the thumb. Is too tight? With two fingers in the middle raise the turntable, then lightly strike the shaft with a mounting hammer. The aluminium plate sits on the conical shaft. Tighten the tonearm and turn the unit, then loosen all the screws on the bottom cover.
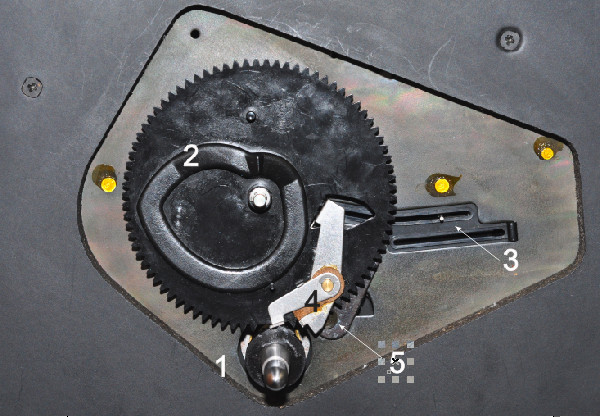
2. Check tonearm trigger levers
The figure shows the control elements for the tonearm movement under the turntable. The drive shaft is not connected to the black gear rim during playback, the latter has a "tooth gap". The sensing element (3) approaches the upper trigger lever (4) during playback and pushes it towards the last groove in such a way that the gear rim is set in motion by the drive wheel. The "clack" noise is produced, gear rim makes a complete revolution and transmits the movement to the 2-dimensional control track (2), which at the bottom guides a pin on a lever and thus raises and rotates the tonearm. This movement can be inhibited by stiff trigger levers (4). They are connected by a thin cork disc. There should be no tough oil or grease on these parts. Even the thin sensing wire, which is connected to the tone arm, must also participate in the tonearm movement without resistance. The concealed lever (5) is directly connected to the operating lever "up / down / cut". In the "cut" position, it ensures that the reset is triggered manually. On the underside of the sprocket (remove the small snap ring to unlock it), the control track should be well greased. Normally this fat is still not tough after 40 years and should be left as it is. However, fibers may have accumulated on the underside. Remove these impurities.
You can test whether the triggering of the return is still working by turning the drive shaft clockwise and at the same time moving the tonearm towards the center (temporarily place the device on the bottom cover). One can then follow how the lever (3) pushes the upper trigger lever and the pinion begins to engage the gear rim. In this movement you should also hear a soft click from the bottom (it is a microswitch, which is now switched by a lever and turns off the engine).
2. Check motor control switches
If everything looks functional, light and clean at the top, the more extensive mechanics of the underside come next. The device has two CHERRY microswitches that can switch on the mains voltage. The switch in question, which controls the motor (A) and its associated tripping lever (B), is shown in the following figure and can not be missed after a certain search. The picture shows the lever in the "motor on" position.
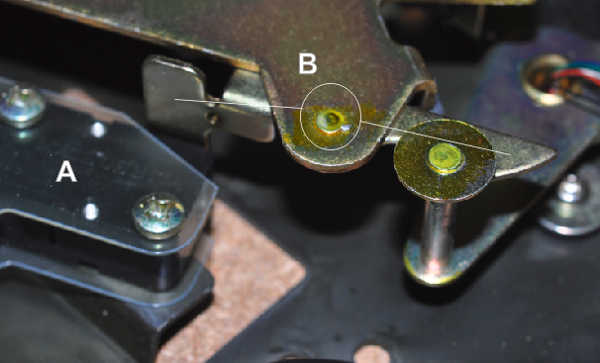
The left lever arm of (B) actuates the switch. Circular marked is the pivot axis around which (B) should turn slightly. But, unfortunately, this connection often does not move freely because of the resination of the fats. This causes the lever to "stick" and keep the switch pressed. The consequence is that the motor is not switched back on when the tonearm is moved towards the beginning of the record - one thinks first of all that fuses or other electronic parts have failed, because the glow lamp on the stroboscope fields also only lights up when the motor is turned.
Some penetrating oil and a few back and forth movements make this joint again free. With benzine or similar solvents and q-tips remove all old, resinous fat residues and do not re-oil them. In the case of the switch itself, make sure that the black switch pin is also very easy to move and is not greasy, otherwise it should be replaced. These ordinary Cherry toogle microswitches are still available. The switching is triggered by light pressure on the switching pin (test with toothpicks or similar) and is accompanied by a click sound.
When everything is moveable again, place the device in the bottom cover and test the functions up / down / cut and auto return with a record. On the occasion one can still check whether the built-in pick-up cartridge still provides a signal and whether the speed synchronization can be adjusted by the use of the pitch-control knob.
For troubleshooting engine problems (synchronism, controllability, torque), please refer to the detailed HITACHI Service Manual DE EN FR
.